PSO eXplorer Config Builder and Node Health Agent
The new version of PSO eXplorer that I just released now includes a Config Builder and Node Health Agent. So a good time for a blog on this new functionality.
As a quick reminder, PSO eXplorer is the the graphical user interface for the Pure Storage CSI driver for Kubernetes that is called Pure Service Orchestrator. Is provides easy access for infrastructure administrators to manage the persistent storage in a Kubernetes infrastructure.
TL;DR You can build a values.yaml file for deploying and upgrading PSO and it now checks IP connectivity to the arrays that are configured. Watch the demo video below.
Before this release, PSO eXplorer provided a readonly user interface, displaying information about the PSO installation. Such as, the volumes provisioned, their growth and performance statistics, etc. With this new release you can now use the GUI to install and upgrade your PSO installation and troubleshoot network connectivity.
Authentication and SSL
As a first step for these features, we had to introduce authentication and SSL encryption for PSO eXplorer. This was actually added in the last release. The deployment now allows you to use an Ingest controller for SSL encryption and specify a username/password either for the entire interface or just for the new configuration section.
To use the Ingest controller, set the following parameters in the values.yaml file when you deploy PSO eXplorer:
ingress:
  enabled: true
  tls: true
  hostname: psox.foo.bar
To modify the username and/or password you can check-out the following section:
credentials:
  anonymousAccess: false
  username: pureuser
  passwordHash: "$2y$10$R1OPJ7MX9qHfps69y/NCv.II/UJGWvHZU/nnNDi6QSFxY90DbZuvS"
The anonymousAccess parameter specifies if you can view the performance data without username password. Is set to false a logon is required for all features of PSO eXplorer. The username and passwordHash options specify the credentials for PSO eXplorer. To set your own password, use the following command on a Linux system or Mac.
htpasswd -bnBC 10 "" 'password' | tr -d ':\n'This will generate the hash for you to use in the section above.
Config Builder
Now that we have PSO eXplorer installed and configured, we can start using the Config Builder. If we go to the Settings -> Configuration section, we are asked to login to PSO eXplorer, for which we use the credentials mentioned earlier.
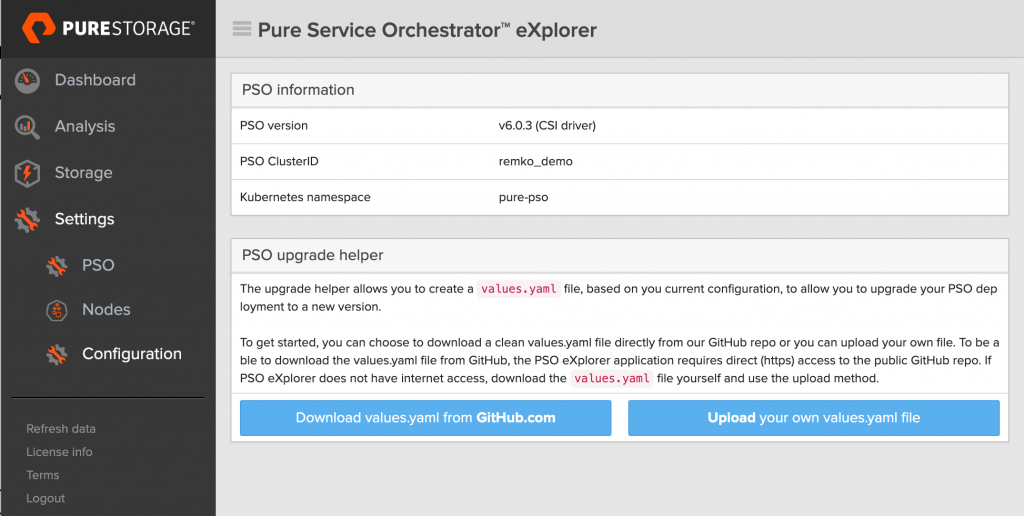
Now we are presented with a choice. If your PSO eXplorer pod has direct internet access, using the GitHub.com method is easiest, since it will download the values.yaml file for you automatically. You’ll then select the edition and version that you want to install (I strongly suggest to only use the new 6.x release). It also shows the release notes so you can see what has changed. However if your Kubernetes cluster does not have internet access, you’ll download the PSO values.yaml file your self from the repo and go from there.
Either way, you’ll end up in the following screen, where you can add the FlashArray and FlashBlade systems you want to use (using the Add new FlashArray, Add new FlashBlade buttons) and make changes to the settings as required. The one thing you’ll have to change is the ClusterID.

Now you can scroll down to the bottom and click the Create YAML file button. You will the be presented with a summary screen like this, which allows you to to download the new values.yaml file and shows you all the command required to install PSO (including the option Snapshot CRDs and Controller).
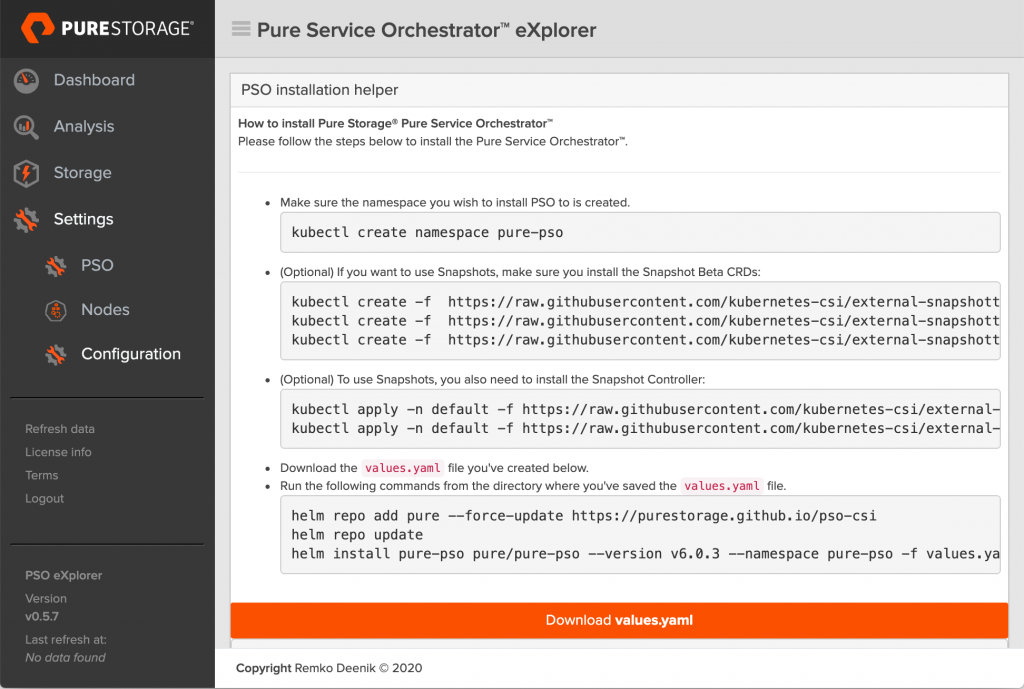
Once you’ve completed the installation, you’ll see that you can use the same process to do an upgrade of PSO.
Node Health Agent
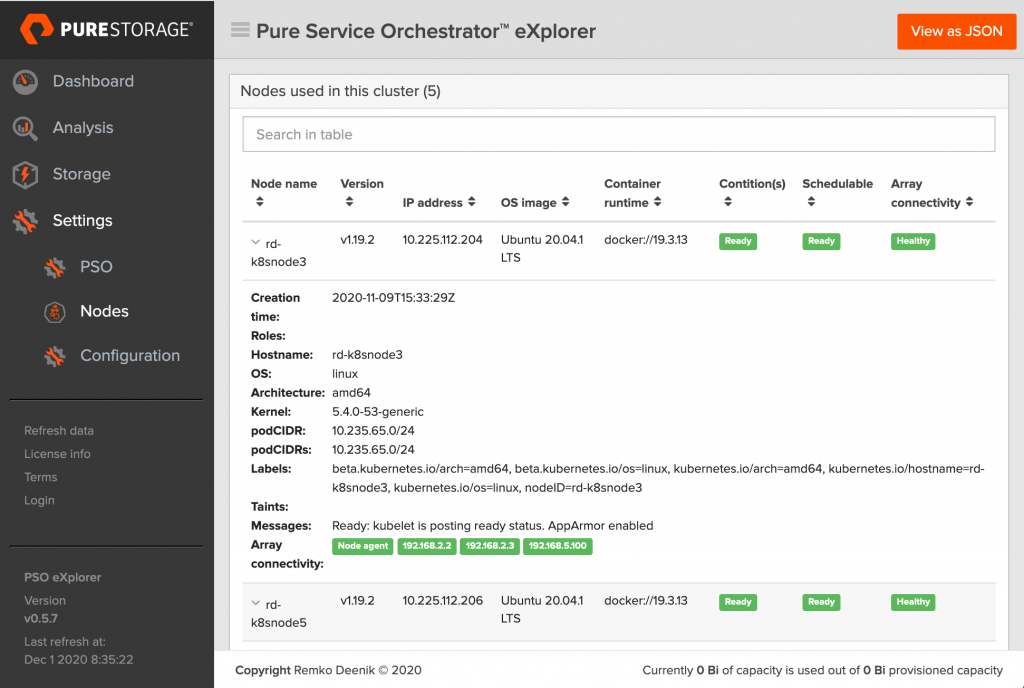
The other new feature introduced is the first version of the Node Health Agent. In this first release all it does is a quick ping to all IP’s that should be reachable from the Kubernetes nodes to check if the network connectivity in okay.
As part of the installation PSO eXplorer will now deploy a DaemonSet on the cluster. This DaemonSet is based on a small python:alpine Docker image running a Python script.
The Python script will contact PSO eXplorer to request a list of IP addresses to check and will return the IP addresses to be checked, based on the roles of the node (such as running the provisioner, or the CSI DaemonSet). This way each node checks just the IP connectivity required for it’s functionality.
Once the Python script has the IP’s to check it will simply ping the IP addresses from each node and sent the results to PSO eXplorer.
If you navigate to Settings -> Nodes you’ll see an extra column called Array Connectivity (which should show Healthy) and if you expand the node details, you can see the status of each IP address that was pinged.
Get PSO eXplorer
If you’re just as excited as I am, make sure to get started on PSO eXplorer yourself. It’s Open Source, so you can use it just like that and also suggest new features or additions if you want.
For installation instructions head over to the GitHub repo here:
https://github.com/PureStorage-OpenConnect/pso-explorer
If you feel like contributing, both the PSO eXplorer application and the Node Health Agent are hosted here:
https://github.com/PureStorage-OpenConnect/pso-explorer-container
I hope you like the new version, and welcome any feedback!