PURE BUILDERS ELASTIC: Containerise my python app
In this second post in this series, I’ll describe how to containerise the Python application that I’ve created in my previous blog in this series. In this blog series I’ll write about the steps I took in my journey to build a teeny tiny data pipeline using Python, Kubernetes and ElasticSearch.
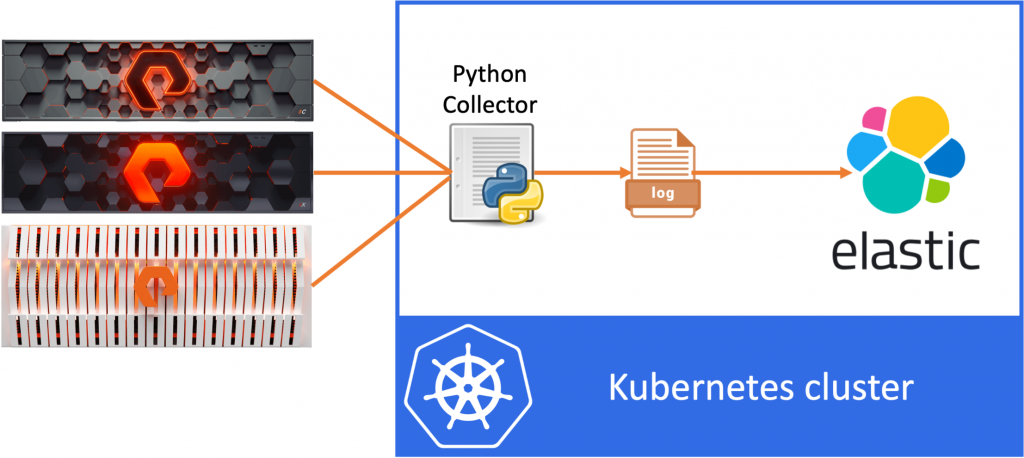
The idea of the data pipeline I’m creating, is to use Python to export data from the FlashArray and FlashBlade to a log file and then ingest this data into ElasticSearch. In my example, I’ll be collecting volume statistics, such as size, used space and the data reduction numbers per volume.
So in this post, we’ll containerise the Python code that we’ve created in the last blog.
Containerise our application
Select our base container image
The code that we created in the previous blog was based on Python and it uses the Pure Storage SDK’s for both FlashArray and FlashBlade. So to run this code in a container, we’ll need to make we have a container with Python and the additional requirements installed.
The first step when creating a container is to select the base image, essentially the source container image from which we’ll build our new container. There are several options to choose from, however I will use a Python image from the official Python repository for the best reliability and supportability. Next, I’ll select the alpine version of the Python base image, since the alpine images are very small and I want to keep the overhead as minimal as possible.
Create our Dockerfile
Now we are ready to create our Dockerfile, which looks as follows:
FROM python:3-alpine

COPY collector.py /usr/local/bin

COPY requirements.txt /etc
RUN pip install --no-cache-dir -r /etc/requirements.txt

WORKDIR /data

CMD /bin/sh -c 'while true; do python3 /usr/local/bin/collector.py; sleep ${refresh_seconds:-60}; done;'
The first line specifies the base image to use, the Alpine version for Python3. By not specifying a Python release (eg. 3.12), we’ll always use the latest release of Python3.
Next we COPY our python program into the container image, to the /usr/local/bin directory, so that it is in the PATH.
We now have our code and Python, but still need to install the required Python packaged. For that I’ve created the following requirements.txt file:
purestorage
purity-fb
We can then specify the RUN pip install command to install these required packages, by specifying the -r option. By specifying the -no-cache-dir option, I also make sure not to cache any of the installation files in my container image to keep my container image as small as possible.
Running our program
We now have our image ready with Python and the required SDK packages installed, so we can define the commands to start our application when the container is stared.
First we’ll make sure to set a WORKDIR, specifies the working directory for the container. This would allows us, for example, to mount persistent storage for the container at this location (/data) once running in Kubernetes, to persist the file output the container creates.
Secondly we specify the CMD to execute when the container is launched. Let’s take a bit closer look at the CMD command:
CMD /bin/sh -c 'while true; do python3 /usr/local/bin/collector.py; sleep ${refresh_seconds:-60}; done;'We call the Alpine shell (/bin/sh) to execute a while statement. Looking at the while statement it’s based on an infinite loop, which contains two commands:
while true;
  do python3 /usr/local/bin/collector.py;
  sleep ${refresh_seconds:-60};
done;'
The first is to run our Python code. The second is to sleep for a couple of seconds. To determine how long to sleep we check the existence of the variable refresh_seconds and if it’s not set, we’ll use 60 seconds as a default.
So now we’ve defined a container that contains al required Python3 binaries, our Python code and will run our code indefinitely every 60 seconds or whichever timeout I specify using the environment variable refresh_seconds.
Build our container
The next step is to actually build the container that we’ve just specified in our Dockerfile. For this I’ll be using Docker.
docker build . -t dnix101/pure-builder:0.4
The docker build command will build the container from the location specified (here I specified the current directory by using the .). Next I give the image a tag dnix101/pure-builder:0.4. This tag consists of three pars:
- Repo name: The first part (
dnix101) specifies the repo for the image, so that I can upload the image later on. - Image name: The second part (
pure-builder) specifies the actual name of the container image. - Version: The third and final part of the tag (
0.4) soecifies the name of this container image.
Now that we’ve build our container, we’ll push it to our container repository (mine is on Docker HUB) so that we can use the image from Kubernetes later on.
docker login
docker push . -t dnix101/pure-builder:0.4
The docker login command will make sure that I’m authenticated to my Docker HUB repo. Then the docker push command uploads my image to the repo.
Conclusion
In this post we’ve used docker to containerise our Python application so that the application is called every 60 seconds (or a custom timeout if specified) to generate regular output. In a next post we’ll run our container on Kubernetes and catch the output so that we can ship it into ElasticSearch.