Snapshots and clones in Kubernetes
The purpose of this lab is to show how to use snapshots and clones in Kubernetes for backup/restore and for cloning applications.
vTeam Specialization Program
Pure Storage nominated me recently to join the Pure Storage vTeam Specialization program for New Stack. The idea behind the program is, to create an active community within Pure Storage. Allowing Puritans to learn and develop their skills and grow into a subject matter experts.
The program consists of training and lab exercises that are focussed on developing experience in the New Stack space (Kubernetes, Ansible, Open Stack and more).
Since I think there are more people out there how want to learn more about New Stack, I will blog my progress in a series of lab exercises.
Lab instructions
The purpose of this lab is to show the use of snapshots and clones in Kubernetes to allow for more flexibility using persistent storage for containers in Kubernetes.
| Name: | Demonstrate persistent volume snapshots and clones |
| Description: | Using the WP deployment from Lab 4 change your password and then recover from a snapshot to get back old password |
| Objective: | Recover a persistent volume from a snapshot after a data corruption |
| Task #1: | Install the PSO volumesnapshot class |
| Task #2: | Scale MYSQL deployment to zero |
| Task #3: | Take a snapshot of the MYSQL PVC |
| Task #4: | Scale MYSQL back to 1 |
| Task #5: | Change password in WordPress |
| Task #6: | Scale MYSQL deployment to 0 |
| Task #7: | Recover snapshot over existing PVC |
| Task #8: | Scale MYSQL back to 1 |
| Task #9: | Login to WP |
| Success Criteria: | Recover WP MYSQL database from a PVC snapshot |
In this lab, I will build on the Kubnernetes environment that I’ve setup earlier (part 1, part 2, part 3). I already removed my WordPress deployment from lab 4, however that allows me to just redeploy that as part of this demo using Helm. Finally I’ve also recently given a demo of a similar task using both Kubernetes, Ansible and FlashArray snapshot/replication, you can read about that here.
Deploy WordPress
The first step is to deploy WordPress, for which I will use the helm chart provided by Bitnami. Using the following steps, which I executed on both the production and development Kubernetes cluster:
helm repo add bitnami https://charts.bitnami.com/bitnami
helm repo update
helm search repo bitnami
helm install wordpress bitnami/wordpress
Helm is a package manager and a great way to deploy (third) party application to your cluster. The reason for that is that it allows you to customize the setup for your own environment by specifying your own variables. Also it allows controlled upgrades of deployed applications to a newer version of the helm chart.
With the commands above, the WordPress application is deloyed and will output something like this:
** Please be patient while the chart is being deployed **


To access your WordPress site from outside the cluster follow the steps below:


1. Get the WordPress URL by running these commands:


  NOTE: It may take a few minutes for the LoadBalancer IP to be available.
        Watch the status with: 'kubectl get svc --namespace default -w wordpress'


   export SERVICE_IP=$(kubectl get svc --namespace default wordpress --template "{{ range (index .status.loadBalancer.ingress 0) }}{{.}}{{ end }}")
   echo "WordPress URL: http://$SERVICE_IP/"
   echo "WordPress Admin URL: http://$SERVICE_IP/admin"


2. Open a browser and access WordPress using the obtained URL.


3. Login with the following credentials below to see your blog:


  echo Username: user
  echo Password: $(kubectl get secret --namespace default wordpress -o jsonpath="{.data.wordpress-password}" | base64 --decode)
These three steps allow you to look-up the IP address for your WordPress environment and the (random) password generated.
Use the information above to check if you can login to your WordPress environment.
Create our snapshot backup
Get our VolumeSnapshotClass
Before we can create out snapshot, we need to make sure that the required feature gates are enabled (check out this blog) and we also need a Snapshot class installed.
Since I’m using the Pure Storage CSI driver, called Pure Service Orchestrator (PSO), I can use the examples as provided here. However each CSI driver might have it’s own specifications, so make sure you check them out.
To create my VolumeSnapshotClass, I’ll issue the following command:
kubectl apply -f https://raw.githubusercontent.com/purestorage/helm-charts/master/pure-csi/snapshotclass.yaml
Which will register the VolumeSnapshotClass in Kubernetes, allowing me to use that class to create actual snapshots.
Create our VolumeSnapshot
Now we are almost ready to create our first snapshot. For that we require the name of the volume we want to create a snapshot for, so we’ll use the following command to list our PersistentVolumeClaims:
kubectl get pvc
This should output something similar to this:
NAME                       STATUS   VOLUME                                     CAPACITY   ACCESS MODES   STORAGECLASS   AGE
data-wordpress-mariadb-0   Bound    pvc-7dd75689-c5ca-4097-9e6c-df442e55b472   8Gi        RWO            pure           47s
wordpress                  Bound    pvc-599f32b5-b8b0-4bb6-9431-d20adfe2edd1   10Gi       RWO            pure           47s
We can see the volume for MariaDB called data-wordpress-mariadb-0. We use that name to create the following yaml file, which I’ll save as snapshot.yaml.
kind: VolumeSnapshot
metadata:
  name: mysql-snapshot
spec:
  snapshotClassName: pure-snapshotclass
  source:
    name: data-wordpress-mariadb-0
    kind: PersistentVolumeClaim
So the name of this snapshot will be mysql-snapshot and the volume to snapshot is data-wordpress-mariadb-0. So let’s create out snapshot:
kubectl apply -f snapshot.yaml
This will create the snapshot. By the way, the lab instructions told us to first scale down the deployment to 0, however when creating a snapshot of a single volume and using the Pure Storage FlashArray that is not required, since the snapshot will be consistent anyways. I will scale down the MariaDB for the restore though.
To see some more details on the new snapshot, run:
kubectl describe volumesnapshot/mysql-snapshot
That will show a bit more details. Among others it’ll show the Status:, where Ready To Use: should be true. That means our snapshot was completed succesfully.
One of the advantages of Pure Storage FlashArray (or Cloud Block Store) is that snapshots are instant, so you don’t have to wait for the snapshot to complete.
Make changes to WordPress
We can now head back to our WordPress deployment and make some changes, such as changing the password. Do note however that in this example we’ve only created a snapshot of the database, so any changes to the file system of the WordPress server (like images) will not be restored when we go back to our snapshot.
Restore our snapshot
Now that we’ve made the changes, let’s go ahead and restore our snapshot. The first thing we’ll do is scale down our MariaDB deployment:
kubectl scale statefulset/wordpress-mariadb --replicas 0
Check the status of the running pods using kubectl get pods and wait for the wordpress-mariadb-0 to terminate
NAME                             READY   STATUS        RESTARTS   AGE
wordpress-674b9bd667-kbq6b   1/1     Running       0          7m
wordpress-mariadb-0          1/1     Terminating   0          7m
Restore snapshot using FlashArray
Now the peculiar thing is that the CSI specification does not allow a snapshot to overwrite an existing PersistentVolumeClaim. As a result we have to jump some hoops to restore our actual snapshot. This might still change in future Kubernetes and CSI version, but for now it is what it is.
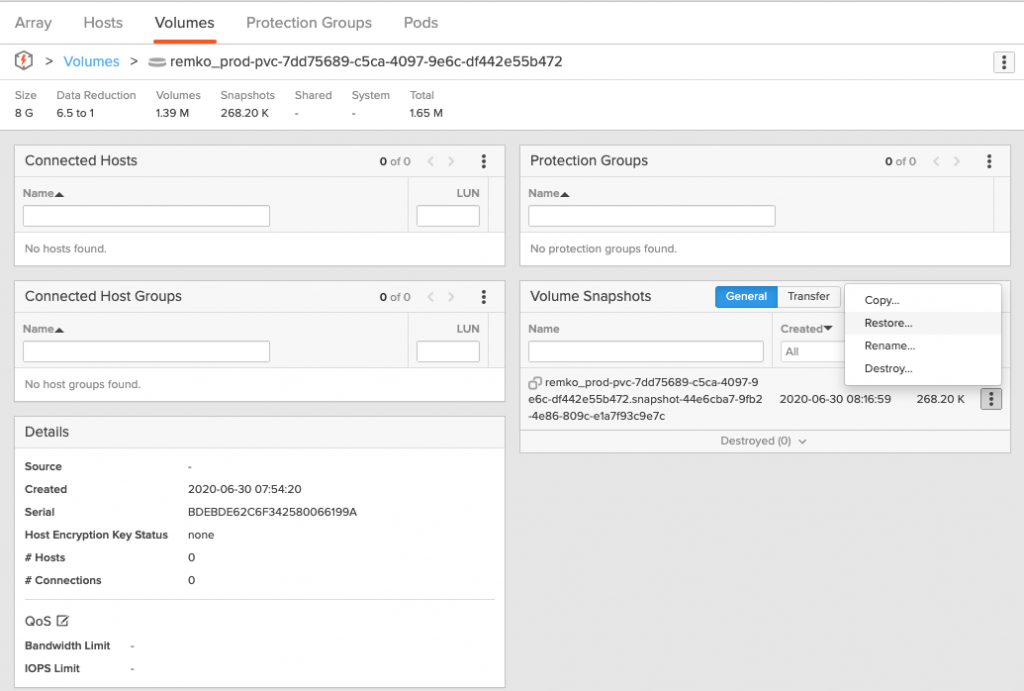
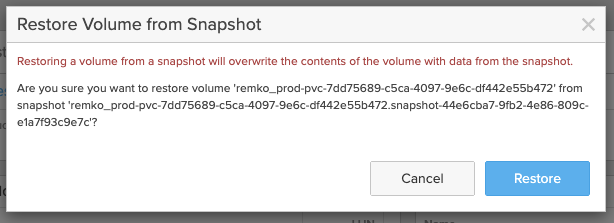
So even though we’ve created a backup by creating a snapshot, we can’t just restore it with a single command from Kubernetes. That leaves us with two options, using the FlashArray gui to restore the snapshot in a single click as shown below:
With that our snapshot was restored.
Restore using native Kubernetes
However as a storage admin I do not want my Kubernetes users to login to my FlashArray to restore snapshots, so I choose to hit Cancel in the screenshot above and went the Kubernetes native route!
The first step is to identify the PersistentVolume that currently backs our PersistentVolumeClaim. We get that name by executing kubectl get pvc. The column VOLUME shows the PersistentVolume name for our MariaDB PVC as pvc-7dd75689-c5ca-4097-9e6c-df442e55b472.
NAME                       STATUS   VOLUME                                     CAPACITY   ACCESS MODES   STORAGECLASS   AGE
data-wordpress-mariadb-0   Bound    pvc-7dd75689-c5ca-4097-9e6c-df442e55b472   8Gi        RWO            pure           84m
wordpress                  Bound    pvc-599f32b5-b8b0-4bb6-9431-d20adfe2edd1   10Gi       RWO            pure           84m
The reason to lookup the PersistentVolume is that if I delete the existing PVC (which is needed to restore our snapshot with the same name), it will also remove the PersistentVolume and the associated FlashArray volume and snapshot. Therefor I patch the PersistentVolume so that it’s not deleted on deletion of the PVC as follows:
kubectl patch pv pvc-7dd75689-c5ca-4097-9e6c-df442e55b472 -p '{"spec":{"persistentVolumeReclaimPolicy":"Retain"}}'Now I can delete the data-wordpress-mariadb-0 PersistentVolumeClaim, without removing our volume and snapshot from the FlashArray.
kubectl delete pvc data-wordpress-mariadb-0
And sure enough if I describe our PersistentVolume, it now shows the status Released.
dnix@adminhost:~$ kubectl describe pv pvc-7dd75689-c5ca-4097-9e6c-df442e55b472
Name:            pvc-7dd75689-c5ca-4097-9e6c-df442e55b472
Labels:          <none>
Annotations:     pv.kubernetes.io/provisioned-by: pure-csi
Finalizers:      [kubernetes.io/pv-protection]
StorageClass:    pure
Status:          Released
Claim:           default/data-wordpress-mariadb-0
...
Now we can proceed to restore our snapshot and use the original PersistentVolumeClaim name. So we’ll prepare our yaml file, which I saved as restore.yaml.
kind: PersistentVolumeClaim
apiVersion: v1
metadata:
  name: data-wordpress-mariadb-0
spec:
  accessModes:
    - ReadWriteOnce
  resources:
    requests:
      storage: 8Gi
  storageClassName: pure-block
  dataSource:
    kind: VolumeSnapshot
    name: mysql-snapshot
    apiGroup: snapshot.storage.k8s.io
Basically this is the same as creating a regular PVC, however we specify the dataSource: to point to our VolumeSnapshot. The name of the new PVC is the same as the original PVC and we also make sure that the size is the same as well.
Actually restore the Kubernetes snapshot
Now let’s go ahead and apply the yaml to restore our snapshot:
kubectl apply -f restore.yaml
This will recreate our PVC:
dnix@adminhost:~$ kubectl get pv,pvc
NAME                                                        CAPACITY   ACCESS MODES   RECLAIM POLICY   STATUS     CLAIM                              STORAGECLASS   REASON   AGE
persistentvolume/pvc-599f32b5-b8b0-4bb6-9431-d20adfe2edd1   10Gi       RWO            Delete           Bound      default/wordpress                  pure                    94m
persistentvolume/pvc-7dd75689-c5ca-4097-9e6c-df442e55b472   8Gi        RWO            Retain           Released   default/data-wordpress-mariadb-0   pure                    94m
persistentvolume/pvc-8acc9f1d-8778-450b-bd07-ad4d786edca6   10Gi       RWO            Delete           Bound      default/data-wordpress-mariadb-0   pure-block              5s


NAME                                             STATUS   VOLUME                                     CAPACITY   ACCESS MODES   STORAGECLASS   AGE
persistentvolumeclaim/data-wordpress-mariadb-0   Bound    pvc-8acc9f1d-8778-450b-bd07-ad4d786edca6   10Gi       RWO            pure-block     5s
persistentvolumeclaim/wordpress                  Bound    pvc-599f32b5-b8b0-4bb6-9431-d20adfe2edd1   10Gi       RWO            pure           94m
The restore has recreated our PVC and also created a new PV, that was copied from our VolumeSnapshot object.
With that we are ready to spin our MariaDB back up again.
kubectl scale statefulset/wordpress-mariadb --replicas 1
This will restart the MariaDB POD, as shown below:
dnix@adminhost:~$ kubectl get pods
NAME                             READY   STATUS              RESTARTS   AGE
wordpress-674b9bd667-7xf75   0/1     CrashLoopBackOff    7          95m
wordpress-mariadb-0          0/1     ContainerCreating   0          4s
Wait for the pods to complete the start-up, which might take a few minutes:
dnix@adminhost:~$ kubectl get pods
NAME                             READY   STATUS    RESTARTS   AGE
wordpress-674b9bd667-7xf75   1/1     Running   0          4m19s
wordpress-mariadb-0          1/1     Running   0          5m43s
Now we can go back to our WordPress application and we’ll see that we’re back to the state when we created our initial snapshot.
Conclusion
That concludes our introduction to the use of snapshots and clones in Kubernetes. We’ve seen how easy it is to create a snapshot directly from Kubernetes. Even though Kubernetes does not support restoring a snapshot over the original PersistentVolumeClaim, we’ve seen that we can easily restore the snapshot using the FlashArray GUI. Also we can use native Kubernetes commands to do the restore, so the Kubernetes user can handle the process al by him self.
I hope this blog has been useful, looking forward to see you in the next one!