How to install DevStack?
About this lab
vTeam Specialization Program
Recently I was nominated to join the Pure Storage vTeam Specialization Program for New Stack. The idea behind the program is to provide a community within Pure for Puritans to learn and develop skills and grow into a subject matter expert.
The program consists of training and lab exercises that are focussed on developing experience in the New Stack space (Kubernetes, Ansible, Open Stack and more). And since I think there are more people out there how want to learn more about New Stack, I though I’d blog my progress of the lab exercises.
Lab instructions
The purpose of this lab is to build an all-in one OpenStack environment using devstack. Devstack is a set of scripts that can be used to quickly setup a complete OpenStack environment that can be used for testing and development.
| Name: | Build OpenStack | Status |
| Description: | Deploy an all-in-one OpenStack cloud | |
| Objective: | Have a running OpenStack deployment using the specific version on a single node | |
| Task #1: | Ensure VM is up to date and create the `stack` user | |
| Task #2: | Clone a copy of the devstack repo | |
| Task #3: | Configure you local.conf for your Pure cinder config | |
| Task #4: | Deploy OpenStack | |
| Task #5: | Create a single volume in openstack cinder to validate the volume gets created on the array | |
| Success Criteria: | Successfully create a single OpenStack Cinder volume on a FlashArray |
I’ll complete this lab in this post, however there are two follow-up labs around using Pure Storage features from Open Stack that will directly follow this blog. Where this post is focussed on installing Open Stack using devstack, the other two will be on using Open Stack Horizon to manage Pure Storage features and using consistency groups from Horizon.
Install Ubuntu
The first step to install Ubuntu and for this lab I’ll be using Ubuntu 18.04, since this is currently the suggested Linux version for devstack. Devstack attempts to support the latest two LTS version of Ubuntu, but as I learned in my previous lab using 20.04, 20.04 is still a bit new.
For the installation, I’ll use the same steps as described here, only now I’ll use Ubuntu 18.04 instead of 20.04.
To allow some testing, I have create a VM with a bit higher specs than used for Kubernetes:
Hostname: devstack
CPU: 4 vCPU’s
Memory: 4 GB
Disk: 200 GB
For the rest the installation is the same.
Installing Devstack
Before we actually start with the Devstack installation, we need to make sure that we meet the requirements.
Preparing our host
Devstack should be installed with a non-root user. In our install we have already created a non-root user (in my case dnix), which we’ll use to install Devstack. This user already has sudo permissions, but the devstack instruction state that we need to enable password less sudo access. For this we’ll execute the following command:
echo "dnix ALL=(ALL) NOPASSWD: ALL" | sudo tee /etc/sudoers.d/dnix
Make sure you replace the username dnix to whatever username you’ve chosen. If this step was successful, you should be able to run the following command, without requiring a password:
dnix@devstack:~$ sudo su -
root@devstack:~#
root@devstack:~# exit
Make sure you exit from this root shell, by issuing the exit command.
Prepare devstack installation
The next step is to prepare our devstack installation. This consists of downloading (cloning) the devstack repo to our host and changing the configuration files.
To clone the repo to our host, use the following:
git clone https://opendev.org/openstack/devstack
cd devstack
Now the first step is to create our local.conf file, which will be used to configure our OpenStack environment deployment . at the very least must contain our administrative password used to access OpenStack. The suggested minimum config for the local.conf file mentioned in the devstack installation guide is as follows:
[[local|localrc]]
ADMIN_PASSWORD=secret
DATABASE_PASSWORD=$ADMIN_PASSWORD
RABBIT_PASSWORD=$ADMIN_PASSWORD
SERVICE_PASSWORD=$ADMIN_PASSWORD
However, now is a good time to look into the sample local.conf file provided in the samples directory.
nano samples/local.conf
For this lab, I want to install a specific version of OpenStack, namely the latest supported and maintained version op OpenStack. As the sample file shows, we can specify specific version for each OpenStack component in our local.conf. I’ll be using the Ussuri release, since at the time of writing, this is the latest maintained release (https://releases.openstack.org/). Going into the devstack repo and opening the available branches, I can see that the Ussuri branch is called stable/ussuri:
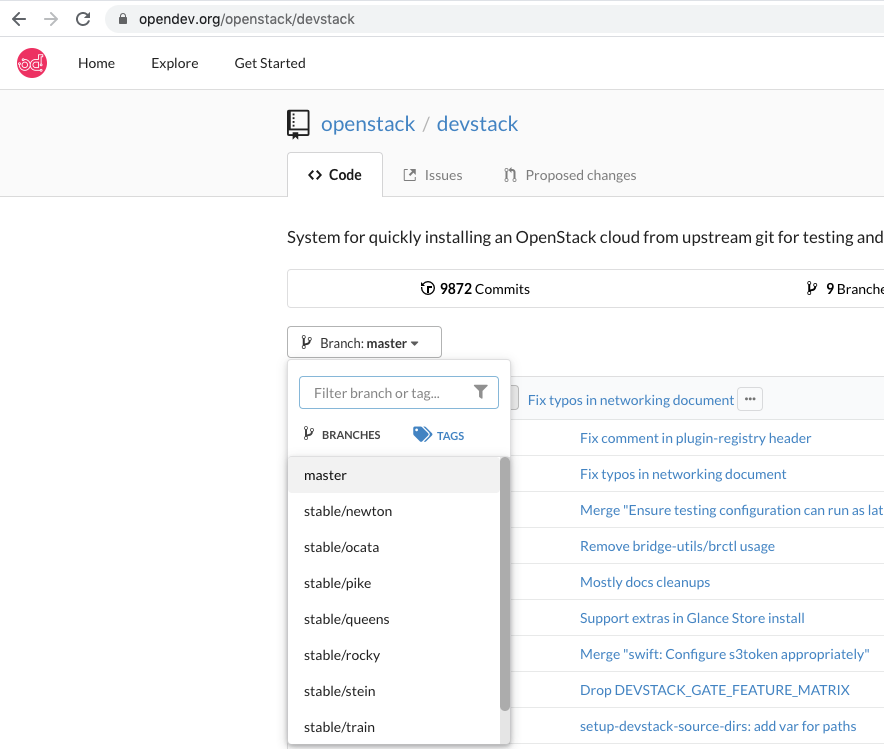
So I’ll add the following to my local.conf:
CINDER_BRANCH=stable/ussuri
GLANCE_BRANCH=stable/ussuri
HORIZON_BRANCH=stable/ussuri
KEYSTONE_BRANCH=stable/ussuri
KEYSTONECLIENT_BRANCH=stable/ussuri
NOVA_BRANCH=stable/ussuri
NOVACLIENT_BRANCH=stable/ussuri
NEUTRON_BRANCH=stable/ussuri
SWIFT_BRANCH=stable/ussuri
With that our local.conf file looks as follows:
[[local|localrc]]
ADMIN_PASSWORD=secret
DATABASE_PASSWORD=$ADMIN_PASSWORD
RABBIT_PASSWORD=$ADMIN_PASSWORD
SERVICE_PASSWORD=$ADMIN_PASSWORD

CINDER_BRANCH=stable/ussuri
GLANCE_BRANCH=stable/ussuri
HORIZON_BRANCH=stable/ussuri
KEYSTONE_BRANCH=stable/ussuri KEYSTONECLIENT_BRANCH=stable/ussuri
NOVA_BRANCH=stable/ussuri
NOVACLIENT_BRANCH=stable/ussuri
NEUTRON_BRANCH=stable/ussuri
SWIFT_BRANCH=stable/ussuri
Install devstack
And with that we are ready to install devstack. A small mention here, we could also immediately deploy the Pure Storage cinder drivers as part of the installation, by adding some additional details to local.conf for cinder. However for the purpose of this lab and blog, I have choosen to seperate those steps. So here goes the install…
./stack.sh
The install will take some time (42 minutes in my lab environment) and should finish with a message similar to the one below, showing the IP address of the host, the URL of the graphical dashboard and the initial username and password created based on what we entered in our local.conf.
This is your host IP address: 192.168.10.155
This is your host IPv6 address: ::1
Horizon is now available at http://192.168.10.155/dashboard
Keystone is serving at http://192.168.10.155/identity/
The default users are: admin and demo
The password: secret

WARNING:
Using lib/neutron-legacy is deprecated, and it will be removed in the future

Services are running under systemd unit files.
For more information see:
https://docs.openstack.org/devstack/latest/systemd.html

DevStack Version: victoria
Change: c3b58f5335fb3545bf49b5d542ef9ed702de43c8 Fix typos in networking document 2020-06-08 11:58:29 +0200
OS Version: Ubuntu 18.04 bionic

2020-06-11 13:32:03.922 | stack.sh completed in 2549 seconds.
Install Pure Storage Cinder driver
Now that we have OpenStack running, we can proceed with the installation of the Pure Storage Cinder driver. The installation is documented on the OpenStack site (https://docs.openstack.org/cinder/latest/configuration/block-storage/drivers/pure-storage-driver.html).
Installing requirements
The first step is to make sure we have our required dependancies installed, which are the Pure Storage FlashArray python SDK and the multipath drivers.
sudo pip install purestorage
sudo apt install multipath-tools
Configuring cinder
Now we are ready to activate the Pure Storage Cinder driver, by editing the cinder configuration:
nano /etc/cinder/cinder.conf
Within cinder.conf look for the [DEFAULT] section and add the following lines, to add two FlashArray systems:
[DEFAULT]
...
enabled_backends = puredriver-1, puredriver-2
default_volume_type = puredriver-1

[puredriver-1]
volume_backend_name = puredriver-1
volume_driver = cinder.volume.drivers.pure.PureISCSIDriver
san_ip = 192.168.10.12
pure_api_token = xxxxxxxx-xxxx-xxxx-xxxx-xxxxxxxxxxxx
use_multipath_for_image_xfer = True

[puredriver-2]
volume_backend_name = puredriver-2
volume_driver = cinder.volume.drivers.pure.PureISCSIDriver
san_ip = 192.168.10.15
pure_api_token = xxxxxxxx-xxxx-xxxx-xxxx-xxxxxxxxxxxx
use_multipath_for_image_xfer = True
What have we just done? We have added two storage backends to Cinder the first called puredriver-1 and the second called puredriver-2, using the enabled_backends parameter. Also we have puredriver-1 as the default backend for OpenStack using the default_volume_type parameter.
To enable the storage backends, we need to restart the cinder-volume service (called devstack@c-vol.service in our devstack deployment), using the following commands:
sudo systemctl restart devstack@c-vol.service
sudo systemctl status devstack@c-vol.service
The second command should return something like this, meaning that the cinder-volume service is active again and our configuration was accepted.
● devstack@c-vol.service - Devstack devstack@c-vol.service
   Loaded: loaded (/etc/systemd/system/devstack@c-vol.service; enabled; vendor preset: enabled)
   Active: active (running) since Thu 2020-06-11 15:44:52 UTC; 1s ago
 Main PID: 15511 (cinder-volume)
    Tasks: 2 (limit: 4660)
   CGroup: /system.slice/system-devstack.slice/devstack@c-vol.service
           ├─15511 /usr/bin/python3.6 /usr/local/bin/cinder-volume --config-file /etc/cinder/cinder.conf
           └─15517 /usr/bin/python3.6 /usr/local/bin/cinder-volume --config-file /etc/cinder/cinder.conf
And that is it. We can now create a volume from the OpenStack dashboard, which will be created on the Pure Storage FlashArray defined in the puredriver-1 section mentioned earlier.
Creating a volume
Using Horizon dashboard
Login to the OpenStack dashboard (http://192.168.10.155/dashboard/), using the correct IP address and credentials as entered earlier during the installation of devstack.
Now navigate to the menu Project -> Volumes -> Volumes
Click the + Create Volume button
Enter a volume name and size and select the type __DEFAULT__ which will now call our default storage backend, which is Pure.
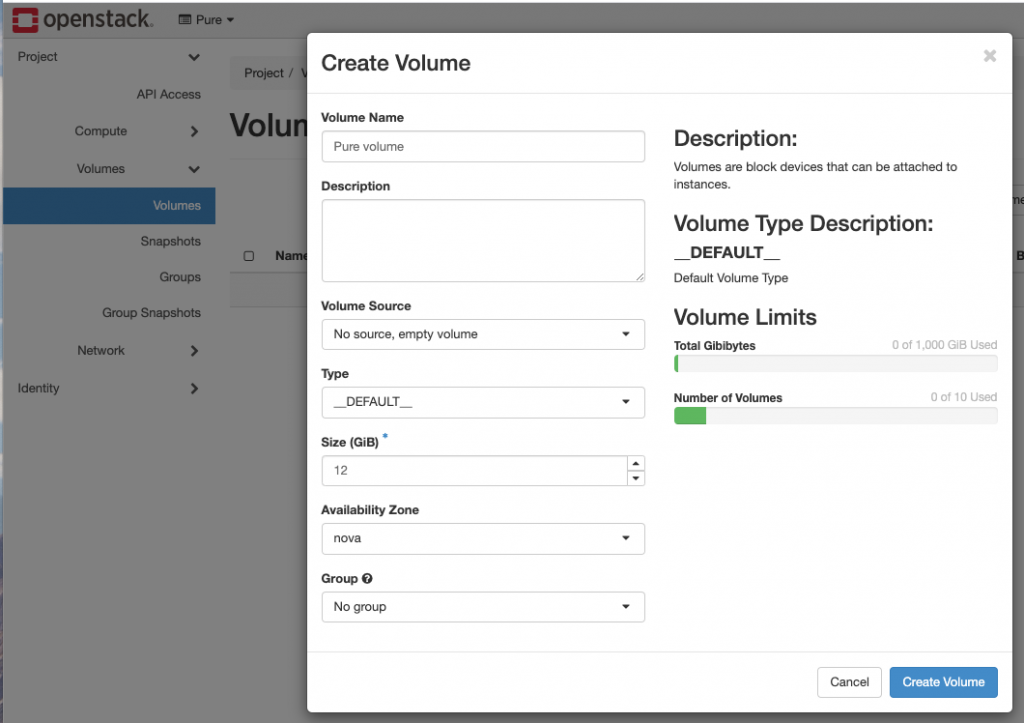
Once you click Create Volume the volume will get created like magic! Just to make sure, I login to my FlashArray and indeed, I see a new volume created as shown below:

Using the CLI
You could also create the volume using the CLI. To use the CLI commands you need to make sure you have the correct environment variable set when you login to your server, otherwise you might see an error like:
Missing value auth-url required for auth plugin password
If this is the case, the Missing value auth-url part points to the fact that some required environment variables have not been set. Execute the following to load the default environment variables:
source ~/devstack/openrc
To check if the variables (especially the auth-url) are set, use the following:
env | grep -i url
This commands dumps the current environment variables and looks for url (using -i will ignore case, so that it will also match URL). This should result in something like:
OS_AUTH_URL=http://192.168.10.155/identityNow that we have that set, creating the volume could be done with the following command:
volume create test --size 13 --type __DEFAULT__
This will create a new volume of 13 GiB in size using the __DEFAULT__ volume type, just like we did before.
Conclusion
That finishes of this lab for now! We’ve deployed devstack on Ubuntu 18.04, installed the Pure Storage requisites and configured FlashArray as a backend. Finally we’ve created a volume and checked if it was also available on the FlashArray.
I hope you enjoyed reading and looking forward to see you in the next two labs, also related to OpenStack!