Clone WordPress using Ansible and PSO
In this blog, I will clone WordPress using Ansible and PSO from production to development.
Why this blog?
Recently I was asked to prepare a demo that was part of a larger DevOps workshop for one of our customers. The idea was to show the value of using automation in a DevOps environment. By cloning WordPress using Ansible and PSO, developers have access to a test environment that closely resembles production and which can be refreshed quickly and easily.
In this blog I will describe how I performed the demo.
Not into reading? Feel free to view the video instead.
Abouw the demo
The workflow
The workflow I will describe in this blog is as follows:
- Deploy WordPress using Helm in production
- Deploy WordPress using Helm in development
- Create some sample data in production
- Use Ansible to copy the data from production to development
This way we clone WordPress from production to development in a repeatable manner. The workflow uses the Pure Storage FlashArray replication and cloning capabilities. These capabilities allow us to create the process in minutes, irrelevant on the size of the persistent volumes used.
The environment
For the demo I created two Kubernetes clusters, one for production and one for development. Each Kubernetes cluster has the Pure Service Orchestrator (PSO) installed and configured to use it’s own FlashArray. To setup PSO yourself, read my blog here.
For this environment we used one FlashArray for production and one for development.
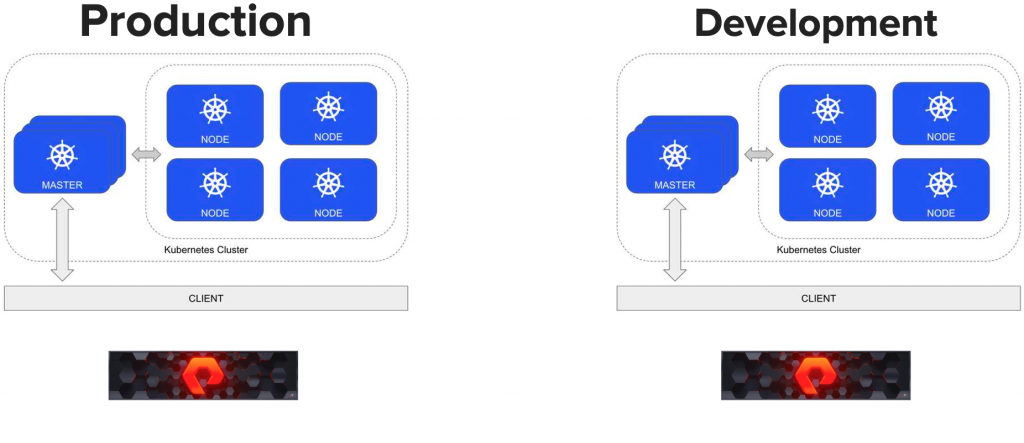
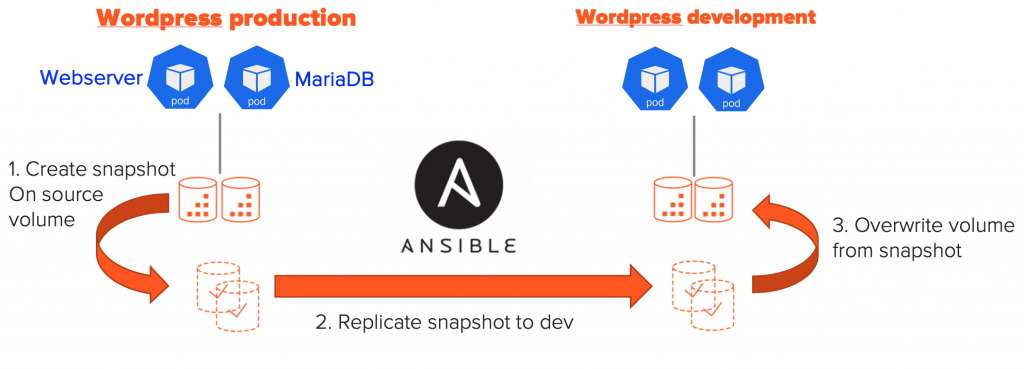
The idea is to deploy two WordPress applications one on production and one in development and use Ansible to clone the volumes from production to development as shown below.
Deploy WordPress
The first step is to deploy WordPress, for which I will use the helm chart provided by Bitnami. Using the following steps, which I executed on both the production and development Kubernetes cluster:
helm repo add bitnami https://charts.bitnami.com/bitnami
helm repo update
helm search repo bitnami
helm install wordpress bitnami/wordpress --set wordpressUsername=user,wordpressPassword=secret,mariadb.db.password=secret,mariadb.rootUser.password=secret
I specify the passwords for WordPress and MariaDB, so that they match between Production and Development. Otherwise the WordPress container wouldn’t be able to login to the MariaDB database once we cloned it from production to development.
A note here: While using the same credentials is good for a demo, this is obviously not recommended in production. In real life you’d use obfuscation to remove sensitive data from the database and also change the credentials when you move between prod and dev.
Clone WordPress using Ansible and PSO
The full copy of playbook described below is available on my GitHub repo.
Defining our Ansible play
The script starts with defining variables and including the Pure Storage Ansible Collections.
- name: Copy wordpress production to development environment
  hosts: localhost
  gather_facts: no
  collections:
    - purestorage.flasharray
  vars:
    labels: "app.kubernetes.io/name=wordpress"
    k8s_namespace: "default"
    wordpress_app: "wordpress"
    mariadb_sset: "wordpress-mariadb"
    wordpress_vol: "wordpress"
    mariadb_vol: "data-wordpress-mariadb-0"
    k8s_prod_ns: "remko_prod"
    k8s_dev_ns: "remko_dev"
    snapshot_name: "ansible"
    pgroup: "wordpress"
    kubeconfig_prod: "/home/user/wordpress/k8s-prod-config"
    kubeconfig_dev: "/home/user/wordpress/k8s-dev-config"
I use a couple of variables at the beginning of the playbook. This makes it easier to modify the playbook for different environments. Honestly, not all of these are required. I could have also used Ansible tasks to lookup this info from Kubernetes. Would be happy to accept comments for improvement 😉
Get FlashArray information
  tasks:
  - name: Load settings
    include_vars: credentials.yaml
  - name: Get name source array
    purefa_info:
      fa_url: "{{ fa_prod_url }}"
      api_token: "{{ fa_prod_api_token }}"
    register: array_info
  - set_fact:
      prod_array: "{{ array_info['purefa_info']['default']['array_name'] }}"
  - name: Get name destination array
    purefa_info:
      fa_url: "{{ fa_dev_url }}"
      api_token: "{{ fa_dev_api_token }}"
    register: array_info
  - set_fact:
      dev_array: "{{ array_info['purefa_info']['default']['array_name'] }}"
Next we load the FlashArray IP addresses and tokens from a separate credentials file (lines 2-3). Next we get the FlashArray hostname from both production and development in lines 4 – 17. We’ll use the hostname later to identify the snapshot on the development FlashArray, later in the playbook.
List our Persistent Volume Claims
Next we’ll connect with the Kubernetes clusters to retrieve the PersistentVolumeClaims used by the WordPress application.
  - name: Get wordpress volumes
    k8s:
      kind: PersistentVolumeClaim
      name: "{{ wordpress_vol }}"
      namespace: "{{ k8s_namespace }}"
      kubeconfig: "{{ kubeconfig_prod }}"
    register: wordpress_pvcs

  - name: Get wordpress volumes
    k8s:
      kind: PersistentVolumeClaim
      name: "{{ mariadb_vol }}"
      namespace: "{{ k8s_namespace }}"
      kubeconfig: "{{ kubeconfig_prod }}"
    register: mariadb_pvcs
The Ansible k8s module (lines 2 and 10) allows to target Kubernetes. Using the kubeconfig: parameter we can pass a kubeconfig file containing the credentials for out two Kubernetes clusters (lines 6 an 14). By specifying only the name and namespace parameters, the module returns the status of these PVCs.
Create a snapshot in production
Now that we have the volume information, we can jump over to the production FlashArray.
  - name: Create protection group
    purefa_pg:
      pgroup: "{{ pgroup }}"
      state: present
      target:
        - "{{ dev_array }}"
      volume:
        - "{{ k8s_prod_ns + '-' + wordpress_pvcs | json_query('result.spec.volumeName') }}"
        - "{{ k8s_prod_ns + '-' + mariadb_pvcs | json_query('result.spec.volumeName') }}"
      enabled: false
      fa_url: "{{ fa_prod_url }}"
      api_token: "{{ fa_prod_api_token }}"

  - name: Create snapshot for each PVC
    purefa_pgsnap:
      name: "{{ pgroup }}"
      suffix: "{{ snapshot_name }}"
      fa_url: "{{ fa_prod_url }}"
      api_token: "{{ fa_prod_api_token }}"
      remote: true
      now: true
In the two tasks above, we create a new protection group (lines 1 – 12). We directlty add the two volumes (lines 8 – 9) and the replication target (lines 5 – 6). We use a json_query to retrieve PersistentVolume (PV) names for the PersistentVolumeClaims (PVC). Next we use the purefa_pgsnap module to create a local snapshot and immediately replicate it to the development FlashArray (lines 20 – 21).
Waiting for the replication to complete
Now a bit of deep dive into Jinja2, for a task to wait for the replication of the snapshot to complete to the remote development FlashArray.
- name: Wait until PG transfer is complete
    purefa_info:
      gather_subset: pgroups
      api_token: "{{ fa_dev_api_token }}"
      fa_url: "{{ fa_dev_url }}"
    register: array_info
    retries: 10
    delay: 5
    ignore_errors: true
    until: "array_info | json_query('purefa_info.pgroups.\"' + prod_array + ':' + pgroup +'\".snaps.\"' + prod_array + ':' + pgroup + '.' + snapshot_name+'\".progress') != 0.0"
The purefa_info module will be used to retrieve information on the protection group and register the result as array_info. We loop the task until the progress of the snapshot replication is completed (shown as 1.0). The json_query uses some variables such as prod_array, pgroup and snapshot_name to look up the progress for the correct snapshot and as long as the progress = ‘0.0’ it will loop the task.
Pause WordPress in development
Now we have our snapshot on our development FlashArray, so we will head over to the development Kubernetes cluster.
  - name: Get wordpress volumes (dev)
    k8s:
      kind: PersistentVolumeClaim
      name: "{{ wordpress_vol }}"
      namespace: "{{ k8s_namespace }}"
      kubeconfig: "{{ kubeconfig_dev }}"
    register: wordpress_pvcs_dev

  - name: Get mariadb volumes (dev)
    k8s:
      kind: PersistentVolumeClaim
      name: "{{ mariadb_vol }}"
      namespace: "{{ k8s_namespace }}"
      kubeconfig: "{{ kubeconfig_dev }}"
    register: mariadb_pvcs_dev

  - name: Scale down WordPress relicas to 0
    k8s:
      name: "{{ wordpress_app }}"
      namespace: "{{ k8s_namespace }}"
      kubeconfig: "{{ kubeconfig_dev }}"
      state: present
      definition:
        apiVersion: apps/v1
        kind: Deployment
        spec:
          replicas: 0

  - name: Scale down MariaDB relicas to 0
    k8s:
      name: "{{ mariadb_sset }}"
      namespace: "{{ k8s_namespace }}"
      kubeconfig: "{{ kubeconfig_dev }}"
      state: present
      definition:
        apiVersion: apps/v1
        kind: StatefulSet
        spec:
          replicas: 0

  - name: Wait for containers to stop
    k8s_info:
      kind: pod
      namespace: "{{ k8s_namespace }}"
      kubeconfig: "{{ kubeconfig_dev }}"
    register: list_pods
    until: "(list_pods | json_query('resources') | count) == 0"
    retries: 20
    delay: 5
First we list the PersistentVolumeClaims for the WordPress on the development environment, in the same way we did for the production environment (lines 1-15). Next we scale down the WordPress and MariaDB replicas to 0. This will stop all Pods in development before we restore the volumes from production (lines 17 – 39). And finally we wait until all Pods have been terminated (lines 41 – 49). This last task is similar to what we did before for the FlashArray replication, but the query is simpler. Just loop as long as the k8s_info returns active Pods aka count > 0.
Clone data from snapshot
Now we can start restoring the production data to the development environment.
  - name: Restore wordpress volume from the snapshot
    purefa_pgsnap:
      name: "{{ prod_array }}:{{ pgroup }}"
      suffix: "{{ snapshot_name }}"
      state: copy
      restore: "{{ k8s_prod_ns + '-' + wordpress_pvcs | json_query('result.spec.volumeName') }}"
      overwrite: true
      fa_url: "{{ fa_dev_url }}"
      api_token: "{{ fa_dev_api_token }}"

  - name: Restore mariadb volume from the snapshot
    purefa_pgsnap:
      name: "{{ prod_array }}:{{ pgroup }}"
      suffix: "{{ snapshot_name }}"
      state: copy
      restore: "{{ k8s_prod_ns + '-' + mariadb_pvcs | json_query('result.spec.volumeName') }}"
      overwrite: true
      fa_url: "{{ fa_dev_url }}"
      api_token: "{{ fa_dev_api_token }}"

  - name: Overwrite dev with prod volume wordpress
    purefa_volume:
      name: "{{ k8s_prod_ns + '-' + wordpress_pvcs | json_query('result.spec.volumeName') }}"
      target: "{{ k8s_dev_ns + '-' + wordpress_pvcs_dev | json_query('result.spec.volumeName') }}"
      overwrite: true
      fa_url: "{{ fa_dev_url }}"
      api_token: "{{ fa_dev_api_token }}"

  - name: Overwrite dev with prod volume mariadb
    purefa_volume:
      name: "{{ k8s_prod_ns + '-' + mariadb_pvcs | json_query('result.spec.volumeName') }}"
      target: "{{ k8s_dev_ns + '-' + mariadb_pvcs_dev | json_query('result.spec.volumeName') }}"
      overwrite: true
      fa_url: "{{ fa_dev_url }}"
      api_token: "{{ fa_dev_api_token }}"
The first two tasks (lines 1 – 19) will copy the snapshot into a new volume on the development FlashArray. It will create the volumes with the same names as were used on the production FlashArray.
The next two tasks (lines 21 – 35) will copy the restored volumes and overwrite the volumes that are used by the WordPress application in the development cluster. Here we use the PSO namespace specified as a variable and the PVC information that was retrieved earlier, to target the correct destination volume on the development FlashArray.
Resume WordPress in development
We have now completed our restore and are able to spin the development WordPress environment up.
  - name: Scale up WordPress relicas to 1
    k8s:
      name: "{{ wordpress_app }}"
      namespace: "{{ k8s_namespace }}"
      kubeconfig: "{{ kubeconfig_dev }}"
      state: present
      definition:
        apiVersion: apps/v1
        kind: Deployment
        spec:
          replicas: 1

  - name: Scale up MariaDB relicas to 1
    k8s:
      name: "{{ mariadb_sset }}"
      namespace: "{{ k8s_namespace }}"
      kubeconfig: "{{ kubeconfig_dev }}"
      state: present
      definition:
        apiVersion: apps/v1
        kind: StatefulSet
        spec:
          replicas: 1
We use the same tasks as used earlier to scale the Deployment and StatefulSet down. However now we scale it back up to 1 replicas each. Once the Pods have completed their startup, we now have completed the restore. The production environment and development environment are now identical.
Conclusion
And that concludes with blog. We’ve seen how we can combine the Kubernetes Ansible modules and the Pure Storage Ansible modules to easily Clone WordPress using Ansible and PSO. And while this example is between to FlashArray, the same playbook could be used for replication between on-prem and the public cloud. It could even be used between Public Clouds by using Cloud Block Store.
I hope you’ve found this blog entertaining and educational. Let me know what you think or if you have any questions or suggestions.
One thought on “Clone WordPress using Ansible and PSO”
what would you like to share again?