Pure Service Orchestrator (PSO)
About this lab
vTeam Specialization Program
Recently I was nominated to join the Pure Storage vTeam Specialization Program for New Stack. The idea behind the program is to provide a community within Pure for Puritans to learn and develop skills and grow into a subject matter expert.
The program consists of training and lab exercises that are focussed on developing experience in the New Stack space (Kubernetes, Ansible, Open Stack and more). And since I think there are more people out there how want to learn more about New Stack, I though I’d blog my progress of the lab exercises.
Lab instructions
The purpose of this lab is to install the Pure Service Orchestrator (PSO) on a Kubernetes. And since I had just finished the lab to build that Kubernetes cluster (you can read about that here: part 1, part 2, part 3), I thought I’d complete this lab as well.
| Name: | Install PSO using Helm |
| Description: | Installation of PSO |
| Objective: | Configure PSO with provided FAs and FBs and install using Helm |
| Task #1: | Obtain API tokens for your supplied FAs and FBs |
| Task #2: | Obtain the latest PSO configuration file and configure for your environment |
| Task #3: | Create a k8s namespace for PSO |
| Task #4: | Install PSO using Helm |
| Task #5: | Validate all resources for PSO are running correctly |
| Task #6: | |
| Success Criteria: | All PSO k8s resources are correctly running |
This lab will be done in a single blog, since it doesn’t require too many steps. I’ll be using the Kubernetes cluster setup in the previous lab as mentioned before and install the CSI version of PSO since the flex driver is deprecated. My Kubernetes cluster will be running on VMware and will use iSCSI and NFS to connect to FlashArray and FlashBlade. If you are using FC, the instructions are not that different, just make sure you install the FC initiator software on the Kubernetes nodes.
Prerequisites
In my previous lab exercise I installed a vanilla Kubernetes cluster. I used Ubuntu 20.04, however I did not specifically install the requirements PSO on the Kubernetes nodes. Requirements for the install are listed here.
Effectively I need to install the iSCSI initiator packages, multipath software and the NFS libraries on each Kubernetes node, using the following command:
sudo apt install open-iscsi multipath-tools nfs-common
Honestly I only had to install nfs-common as open-iscsi and multipath-tools is now installed by default for Ubuntu 20.04.
Obtain API tokens
To be able to install PSO we need to first retrieve the API tokens of the FlashArray(s) and FlashBlade(s) we want to add to PSO.
FlashArray
For this blog I’ll be using the GUI for FlashArray and the CLI for FlashBlade, just because we can.
- Login to FlashArray and go to Settings -> Users
- Click the three dots in the right top and click Create Users…

3. Enter a username and select Storage Admin as the user role enter a password and click Create
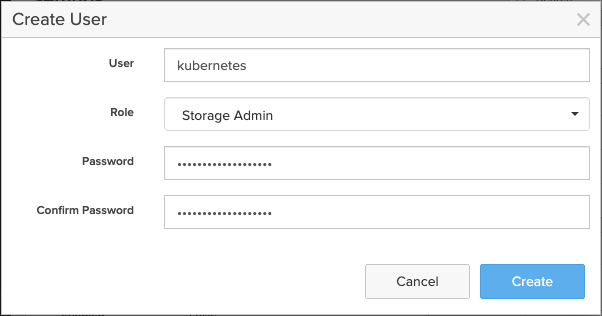
4. Now click on the three dots of the newly created user and select Create API Token…

Accept the default values and click Create

Write down the token shown in the wizard. Once you close this window you can no longer access the API token via the GUI. You’d need to use the method described below for FlashBlade to expose the API token. The commands are the same between FlashArray and FlashBlade.

FlashBlade
For the FlashBlade system that was assigned to me there was already a API token created for pureuser, so I’ll use the CLI to expose this API token for me to use.
- First use ssh to connect to the FlashBlade system
- Login as the user you need to expose the API token for (in this case pureuser)
- Once logged-in use the
pureadmin list --expose --api-tokencommand to show the API token as shown below in purple
dnix:~$ ssh pureuser@192.168.10.18
pureuser@10.225.112.69's password:
Welcome to Purity//FB
(flashblade01-ch1-fm2 3.16.0-44-iridium #59~14.04.1 SMP PREEMPT Sat Apr 25 01:31:07 UTC 2020)
Last login: Tue May 26 09:35:28 2020 from 172.16.225.246
pureuser@flashblade01> pureadmin list --expose --api-token
Name API Token Created Expires
pureuser T-xxxxxxxx-xxxx-xxxx-xxxx-xxxxxxxxxxxx 2020-05-08 06:00:24 BST -
pureuser@flashblade01>
Install PSO
Get our values.yaml
The first step to install PSO is to create our own version of the values.yaml file. There are two approaches for this:
- Create your own
values.yamlfile with only the settings you want to change. This can possibly be a bit harder to do since you need to do the formatting yourself. However you’d be able to reuse yourvalues.yamlfile for new versions of PSO without needing to check the default values. - Download the example
values.yamlfrom the PSO repo and change the values to our needs.
I’ll take the second approach, although for production the first might be more future proof. For the install I’ll use the control node create in my previous lab exercise.
I’ll create a dedicated directory for my values.yaml and download the example file from github, using the following:
cd ~
mkdir pso
cd pso
wget https://raw.githubusercontent.com/purestorage/helm-charts/master/pure-csi/values.yaml
Now we can use nano to make our edits to the file.
nano values.yaml
There are just a three things I’m going to change. First we’ll enable Storage Topology by setting storagetopology.enable to true, which allows us to control where volumes are created using labels.
Second we’ll set namespace.pure to my own specific version (dnix in my case). Basically this value needs to be unique for each PSO instance to separate multiple environments from each other on the Pure Storage arrays.
Finally I’ll add my FlashArrays and FlashBlades to the values.yaml file under the array: section, using the API tokens recorded earlier.
...
storagetopology:
  enable: true
...
namespace:
  pure: "dnix"
...
arrays:
  FlashArrays:
    - MgmtEndPoint: "192.168.10.12"
      APIToken: "xxxxxxxx-xxxx-xxxx-xxxx-xxxxxxxxxxxx"
    - MgmtEndPoint: "192.168.10.15"
      APIToken: "xxxxxxxx-xxxx-xxxx-xxxx-xxxxxxxxxxxx"
  FlashBlades:
    - MgmtEndPoint: "192.168.10.18"
      APIToken: "T-xxxxxxxx-xxxx-xxxx-xxxx-xxxxxxxxxxxx"
      NFSEndPoint: "192.168.10.18"
Install PSO using Helm3
In the past we change from Helm2 to the Operator method, since RedHat moved that direction for OpenShift. However with OpenShift 4.3 RedHat is moving back to Helm3, which is now the preferred way to install PSO.
To be able to PSO using Helm, we’ll need to add the Pure Storage Helm repo to our Helm environment, using the following commands:
helm repo add pure https://purestorage.github.io/helm-charts
helm repo update
Once the repo is added, you can use the following command to check if PSO can be found in the repo:
helm search repo pure-csi
We want to install PSO in a dedicated namespace in our Kubernetes cluster. For this I’ll create the namespace pure-csi using the following command:
kubectl create namespace pure-csi
Next we’ll do a dry run of the installation, to make sure the values.yaml is working correctly.
helm install pure-storage-driver pure/pure-csi --namespace pure-csi -f ./values.yaml --dry-run --debug
If the command does not return any errors, let’s go ahead and do the actual install:
helm install pure-storage-driver pure/pure-csi --namespace pure-csi -f ./values.yaml
This should return something like the following:
NAME: pure-storage-driver
LAST DEPLOYED: Thu May 28 16:59:33 2020
NAMESPACE: pure-csi
STATUS: deployed
REVISION: 1
TEST SUITE: None
Check PSO installation status
To check if PSO is up and running, run the following command, which will basically list the pods, services, deamonsets and statefulsets in the pure-csi namespace:
kubectl get all -n pure-csi
If everything is well, we should see a pod/pure-csi-xxxxx for each Kubernetes node that we have and a single pod/pure-provisioner-0 all in running stateas shown below.
NAME READY STATUS RESTARTS AGE
pod/pure-csi-mktrw 3/3 Running 2 3m10s
pod/pure-csi-n2hkr 3/3 Running 0 3m10s
pod/pure-csi-qjpsd 3/3 Running 0 3m10s
pod/pure-provisioner-0 4/4 Running 0 3m10s
Now that PSO is up and running, it’s good practice to see if everything works fine and the easiest way to do that is to create a quick test PersistentVolumeClaim (pvc).
nano pvc.yaml
Past the following
kind: PersistentVolumeClaim
apiVersion: v1
metadata:
name: pvc-pure-block
spec:
accessModes:
- ReadWriteOnce
resources:
requests:
storage: 10Gi
storageClassName: pure-block
And run the following to provision the volume:
kubectl apply -f pvc.yaml
Check if the pvc is created and bound using:
kubectl get pvc
Which should return something like:
NAME STATUS VOLUME CAPACITY ACCESS MODES STORAGECLASS AGE
pvc-pure-block Bound pvc-becebb60-b45a-45be-963c-bd4de9e9c593 10Gi RWO pure-block 4s
Basic troubleshooting
If the newly created pvc shows as pending:
NAME STATUS VOLUME CAPACITY ACCESS MODES STORAGECLASS AGE
pvc-pure-block Pending pure-block 73s
Something is wrong with our configuration. Use the following commands to check the PSO log file:
kubectl logs pod/pure-provisioner-0 -n pure-csi -c pure-csi-container |grep error
This will show any errors that have occurred. Some common examples are:
- Wrong API token;
- No FlashArrays or FlashBlades added to our
values.yaml(this could also be the case if incorrect case was used. Soflasharraysis not the same asFlashArrays. - No IP access from the Kubernetes nodes to the array’s management IP;
- No IP access from the Kubernetes nodes to the array’s data/iSCSI IP’s;
- Not adding the
NFSEndPointparameter for the FlashBlade configuration.
Make the required changes to the values.yaml file and apply the new configuration using the following helm command:
helm upgrade pure-storage-driver pure/pure-csi --namespace pure-csi -f ./values.yaml
By specifying upgrade instead of install the command will only update our settings. Remove the pvc and reapply it as follows:
kubectl delete -f pvc.yaml
kubectl apply -f pvc.yaml
Check if the PVC was created and bound successfully and the installation of PSO is completed.
PSO eXplorer
We are actually done with the install, but I’d like to point quickly to a personal project I’ve done recently which is called PSO eXplorer. It’s inspired on the great project by Joshua Robinson that is posted here.
It provides a basic GUI to PSO and allows PSO users with a GUI and a JSON export of the volumes mounted and space usage of PSO in the Kubernetes cluster.
The setup is pretty simple, just install using Helm.
helm repo add pso-explorer 'https://raw.githubusercontent.com/PureStorage-OpenConnect/pso-explorer/master/'
helm repo update
helm install pso-explorer pso-explorer/pso-explorer --namespace pso-explorer
To be able to access the GUI, you’ll need to get the IP address of the service using:
kubectl get all -n pso-explorer
Which should show you the IP address of the service as shown in the output below.
NAME READY STATUS RESTARTS AGE
pod/pso-explorer-694f5856d8-846cm 1/1 Running 0 6m4s

NAME TYPE CLUSTER-IP EXTERNAL-IP PORT(S) AGE
service/pso-explorer ClusterIP 10.233.52.137 80/TCP 17h

NAME READY UP-TO-DATE AVAILABLE AGE
deployment.apps/pso-explorer 1/1 1 1 17h

NAME DESIRED CURRENT READY AGE
replicaset.apps/pso-explorer-694f5856d8 1 1 1 17h
The other thing is that you need to route network traffic from your workstation to the cluster (if that’s not been done already). In my case my laptop is on the same subnet as my Kubernetes cluster, so all I do on my Mac is the following:
sudo route add 10.233.0.0/16 192.168.10.121
Basically I route the 10.233/16 subnet to my Kubernetes cluster. I can point the route to any node in the cluster that has the calico role, but I tend to use the first node for my labs. For production, you should dive into calico and the BGP routing is uses, to make sure that you correctly setup routing into and out of the cluster.
Once I installed PSO Analytics GUI and added the route to my workstation, I can access the service, which shows me the following:

The dashboard shows some general information of the cluster including my arrays (I’ve added four), the default storage classes created by the PSO installer and I have one volume provisioned (the one we did earlier in this blog). If I click on the 1 for Volumes, I can see some more details on the volumes currently in use:
All data can be exported in JSON for reuse in other applications or tools. Again this was just a side step, but I hope the tool can be useful to others.
Conclusion
That is all for this lab, we have installed the prerequisites for Pure Service Orchestrator on our Kubernetes nodes. We retrieved the API tokens for our FlashArray(s) and FlashBlade(s), we then installed and tested PSO and possibly you’d had to do a bit of troubleshooting. Pretty nice I’d say, so let’s call it a day and finish off for now.
Thanks for reading along and see you next time.
One thought on “Pure Service Orchestrator (PSO)”
kubectl apply -f https://raw.githubusercontent.com/dnix101/pso-analytics-gui/master/pso-analytics-gui.yaml
error code 404