Using Ansible for Hybrid Cloud DevOps – part 2 of 2
This is the second part of this blog on using Ansible within a Hybrid Cloud DevOps environment. If you missed the first part, that a look here https://d-nix.nl/2019/08/using-ansible-for-hybrid-cloud-devops/.
In the first part I demonstrated using Ansible and the Pure Storage FlashArray or Cloud Block Store to replicate a block storage volume from one array to the other. The way Pure handles snapshots and volume copies is very simple and flexible which makes it a very powerful product in a DevOps environment.
This second part of the blog will be around importing the replicated volume into Kubernetes so that we can use it for our test and dev workloads in Kubernetes.
One of the nice things to notice here is that a volume copy on FlashArray or Cloud Block Store doesn’t actually consume any storage. This is due to the highly efficient deduplication engine that is used within the product. So unlike with regular public cloud storage, where each copy is charged for the full amount of provisioned space, we can now easily spin up tens of copies of the same volumes, without actually consuming additional storage. I found that the costs involved with storage has in the past actually kept DevOps organizations back on public cloud from going all-in.
Of course we do still have to pay for compute, but this is where Kubernetes provides an advantage to spin up small or large containers that fit Just the need of our developers. That way we don’t need an entire EC2 instance for each copy of our environment that we spin-up. Also we can move a lot quicker using containers that we would using regular virtual machines or EC2 instances.
About the workflow
So just to be clear, the workflow for this blog is the following, where this second part will focus on steps 4 and 5.
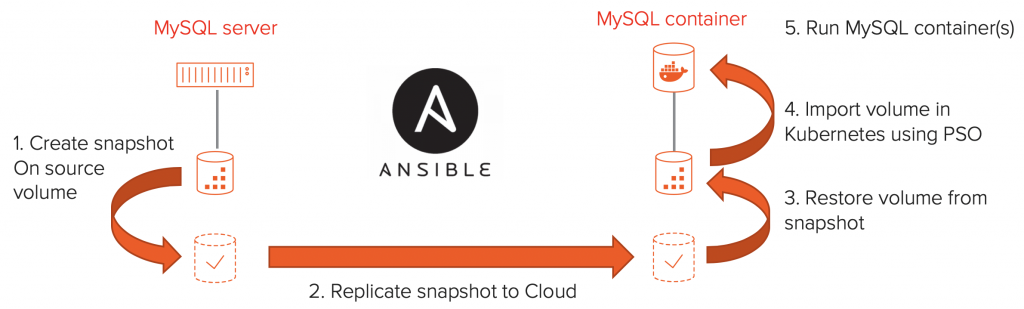
We will start with our volume copy on the target array, create some more copies, since we want multiple dev/test copies, and import those copies into Kubernetes as Persistent Volume Claims (PVC’s) using the Pure Services Orchestrator. Once we have the PVc’s in place we will spin up some MySQL containers using the PVC’s to provide access to the database copy for our developers.
So let’s jump right into the second part of our Ansible magic!
Getting started with some variables
The first thing is defining some variables that we will use for the rest of the playbook.
- name: Import a volume in Kubernetes as a PVC
  hosts: localhost
  gather_facts: yes
  vars:
    fa_url: 172.39.1.1                                           # IP address or URL for FlashArray
    fa_api_token: xxxxxxxx-xxxx-xxxx-xxxx-xxxxxxxxxxxx          # API token used for source FlashArray
    source_vol: xxxxxxxx-xxxx-xxxx-xxxx-xxxxxxxxxxxx            # Volume name to import
    deployment_prefix: mysql
    num_of_deployments: 5
    namespace: purestorage
  tasks:
These variables should be customised to your environment. Where the “fa_url” parameter contain the IP address or DNS name of the FlashArrays or Cloud Block Store instances to work with. The “fa_api_token” is used for authentication on the array. The source volume is the name of the volume to start with.
A quick note here: If you just wanted to run this entire procedure using just a single array, you could easily do so by skipping the first part of this blog and just directly specifying the MySQL server’s source vVol here as “source_vol”. From there on we will continue to create a volume copy of the MySQL vVol and import the copy in Kubernetes. There is no difference here between a replicated volume or the actual source volume.
The second part of the variables relate to the Kubernetes environment. First I specify a prefix used to name the Kubernetes resources, to easily identify the deployments, next the number of copies I wish to create and finally the Kubernetes namespace to create the resources in.
Collecting some facts on the environment
  - name: Get source volume information
    purefa_facts:
      gather_subset: volumes
      api_token: "{{ fa_api_token }}"
      fa_url: "{{ fa_url }}"
    register: output
  - set_fact:
      volume_size: "{{ output | json_query('ansible_facts.ansible_purefa_facts.volumes.\"' + source_vol + '\".size')/1073741824 }}"
      temp_vol_name: "{{ ansible_facts['date_time']['iso8601_basic_short'] }}"
The next thing we want to do is to collect some information on the volume that we’ll be working with. When importing a volume in Kubernetes, using the Pure Service Orchestrator, we need to specify the volume size. Now I don’t want to specify the volume size as a variable, since once the original volume would be resized, that would break our playbook. So I use the purefa_facts module to collect the size of the volume and using json_query I store the size as volume_size parameter. Within that query I also convert to size from bytes to GiBi by dividing it by 1073741824 (1024x1024x1024).
I also set a variable temp_vol_name that I will use to the name of the volume copy, before importing the volume into Kubernetes as a PVC.
Cloning our source volume
  - name: Clone the source volume for use within Kubernetes
    purefa_volume:
      name: "{{ source_vol }}"
      target: "{{ temp_vol_name + '-' + item }}"
      fa_url: "{{ fa_url }}"
      api_token: "{{ fa_api_token }}"
      overwrite: yes
      state: present
    with_sequence: start=1 end={{ num_of_deployments }} format={{ '%02x'}}
Now that we have all the info we need, we can start with copying the volumes from our source volume. We use the purefa_volume module, which will simply create a volume copy of the source volume (specified by the “name” parameter). The name used for the new volume is specified by “target”, where I insert the “temp_vol_name“ mentioned earlier appended with the sequence number for this volume. The sequence number is determined by the last line where we loop the task from 1 up to the “num_of_deployments” specified in our variables.
Once this command completes (should only take a few seconds) we now have five copies of our source volume.
Importing our volumes into Kubernetes
  - name: Import volume clone in Kubernetes using a PersistentVolumeClaim
    k8s:
      state: present
      force: yes
      definition:
        apiVersion: v1
        kind: PersistentVolumeClaim
        metadata:
          name: "{{ deployment_prefix + '-volume-' + item }}"
          annotations:
            import.volume.beta.purestorage.com/name: "{{ temp_vol_name + '-' + item }}"
          namespace: "{{ namespace }}"
        spec:
          accessModes:
            - ReadWriteOnce
          resources:
            requests:
              storage: "{{ volume_size + 'Gi' }}"
          storageClassName: pure-block
    with_sequence: start=1 end={{ num_of_deployments }} format={{ '%02x'}}
Now that we have our volume copies, we want to import those into Kubernetes. We will be using the Ansible k8s module for this, which van be used to create a persistent volume claims and deployments. Since the Pure Service Orchestrator is integrated in Kubernetes, we don’t need anything other than a native Kubernetes API interface to import the volume.
In the snippet above we see the basic YAML required for creating a Persistent Volume Claim in Kubernetes. The specific parts to note here are:
Line 11: Where we use the “import.volume.beta.purestorage.com/name” annotation to tell the Pure Service Orchestrator to import a volume with the name specified.
Line 18: Here we specify the size of the volume that we are about to import. We collected that information earlier in the playbook and all we need to do here is pass the variable along.
Line 19: Where we specify that the storage class being used for this PVC as “pure-block” storage class. This will invoke the Pure Service Orchestrator to do it’s magic.
As with the volume copy operation, we loop through this task “num_of_deployments” times, to import all volume copies that we created.
Deploying the MySQL containers
  - name: Create a Kubernetes deployment using the PersistentVolumeClaim
    k8s:
      state: present
      force: yes
      definition:
        apiVersion: apps/v1
        kind: Deployment
        metadata:
          name: "{{ deployment_prefix + '-' + item }}"
          namespace: "{{ namespace }}"
        spec:
          selector:
            matchLabels:
              app: mysql
          strategy:
            type: Recreate
          template:
            metadata:
              labels:
                app: mysql
            spec:
              containers:
              - image: mysql:5.7
                name: mysql
                env:
                - name: MYSQL_ROOT_PASSWORD
                  value: password
                ports:
                - containerPort: 3306
                  name: mysql
                volumeMounts:
                - name: "{{ deployment_prefix + '-volume-' + item }}"
                  mountPath: /var/lib/mysql
              volumes:
              - name: "{{ deployment_prefix + '-volume-' + item }}"
                persistentVolumeClaim:
                  claimName: "{{ deployment_prefix + '-volume-' + item }}"
    with_sequence: start=1 end={{ num_of_deployments }} format={{ '%02x'}}
The last part is deploying the actual MySQL containers in Kubernetes, which is shown above. Most of this is regular Kubernetes that we all know and love (or at least I hope you do ;-), where I used the mysql:5.7 container image (which is the same version of MySQL that I had on my VMware virtual machine).
We specify the PVC that we created on lines 34 through 37, which attaches the correct volume to our container. In lines 31 through 33 we mount the volume in /var/lib/mysql, which is the database location used by the mysql:5.7 image.
Once the deployment is completed, we can login to the mysql container and see that all databases that we had on-prem are now also available in our container.
If you want to go ahead and test this out, I have the entire script on my GitHub repo, so take a look:
https://github.com/dnix101/purestorage/blob/master/ansible/fa_k8s_mysql_deployments_from_volume.yaml
Conclusion
With that we have our playbook completed. In the first part of the blog we created a snapshot of our virtual MySQL server running on VMware using vVols. We replicated that snapshot to our target array, being either a FlashArray or a Cloud Block Store. In the second part of this blog we created some copies of the replicated volume on our target and imported those copies as Persistent Volume Claims in Kubernetes. We finished with starting the MySQL deployments in Kubernetes that use the Persistent Volume Claims, leaving us with multiple running database copies on Kubernetes.
Some key take aways here are that we were able to combine the “legacy” virtual machine running MySQL with a Dev/Test environment in Kubernetes. Also since creating multiple copies on FlashArray or Cloud Block Store does not consume storage, we can provide as many copies as we need to our developers to run their development work against. And finally the simplicity of both the FlashArray/Cloud Block Store and the Pure Service Orchestrator allows these kind of workflows to be created quickly and in my lab environment the entire proces is finished within minutes, making it very usable.
I hope you had fun reading through this blog. If you have any questions, please feel free to reach out to me.