Using Ansible for Hybrid Cloud DevOps – part 1 or 2
Update October 22nd: Changed the Ansible playbook to use the purefa_info module instead of the purefa_facts following the change as described here.
Lately I’ve been spending more time on Kubernetes, since I believe that containers and serverless together provide the foundation for any Cloud Native application, that could be even bigger than VMware is for virtualisation.
However when I speak with organisations on how they use containers, they basically tell me that containers are only used for new applications, created by the development department. However most of the current applications are still running in the traditional IT environment. There seems to be a big devide between these environments and people end up copying data and converting data all the time to create a good development/test environment. This has brought me to this blog, where I’d like to spend some time on using Ansible to bridge the gap between the on-prem datacenter and a Kubernetes development environment.
This blog will be a two part blog, where in the first part I will discuss cloning a volume on Pure Storage FlashArray to a remote FlashArray or a Pure Storage Cloud Block Store instance running in the public cloud. The second part will be on importing the replicated volume in Kubernetes.
About the workflow
The workflow that I will discuss in this blog is the following:
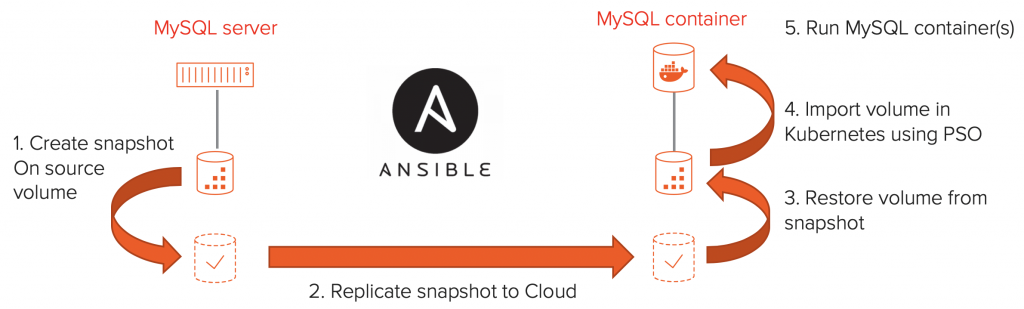
We will start it a traditional database server that runs on-premise. In this example I have chosen MySQL as the database and use VMware with vVols as the underlying infrastructure. For storage I use the Pure Storage FlashArray.
The Ansible workflow will create a snapshot, replicate that snapshot to a Pure Storage Cloud Block Store or another FlashArray, either of which are connected to a Kubernetes Cluster. Once the snapshot is replicated, the script will clone five volumes out of the snapshot on the target array and will import these into Kubernetes using a Persistent Volume Claim (PVC). Finally it will deploy five MySQL Kubernetes deployments that uses the previously created PVC’s to be able to access the database files. Resulting in a copy of the on-premise MySQL database server running in a Kubernetes environment.
So let’s jump right into the Ansible script!
Gathering some information before we start
The first step is to create a snapshot on the source array and replicate it to the Cloud Block Store instance or target FlashArray. I’ll be using Ansible for this, as this is a great solution for building workflows like this. Also the Pure Storage module is included by default with Ansible, which makes it very easy to use.
So let’s get at it, the first part of the Ansible playbook set’s some variables and retrieves some basic information.
---
- name: Create a remote copy of a volume using it's protection group
  hosts: localhost
  gather_facts: yes
  vars:
    fa_url_source: 10.10.1.1
    fa_api_token_source: xxxxxxxx-xxxx-xxxx-xxxx-xxxxxxxxxxxx
    source_pg: mysqldemo
    source_vol: vvol-mysql-b4ec20d1-vg/Data-e0e1b633
    fa_url_target: 172.39.1.1
    fa_api_token_target: xxxxxxxx-xxxx-xxxx-xxxx-xxxxxxxxxxxx
  tasks:
  - name: "Collect info for source array ({{ fa_url_source }})"
    purefa_info:
      fa_url: "{{ fa_url_source }}"
      api_token: "{{ fa_api_token_source }}"
  - set_fact:
      fa_host_source: "{{ array_info['purefa_info']['default']['array_name'] }}"
  - name: "Collect info for target array ({{ fa_url_target }})"
    purefa_info:
      fa_url: "{{ fa_url_target }}"
      api_token: "{{ fa_api_token_target }}"
    register: array_info
  - set_fact:
      fa_host_target: "{{ array_info['purefa_info']['default']['array_name'] }}"
      snapshot_name: "{{ ansible_facts['date_time']['iso8601_basic_short'] }}"
In the script above we see some variables to start with, these should be customised to your environment. Where the “fa_url_*” parameters contain the IP address or DNS name of the FlashArrays or Cloud Block Store instances to work with. The “api_token_*” is used for authentication on the arrays. The source volume and protection group name from the source array to work with.
Next we see four tasks, where two tasks use the “purefa_facts” module to collect information of the arrays (lines 13 and 19). All we need to specify to collect facts is the IP address of the array and the API token. The results are returned as ansible_facts, which we store using Ansible “set_fact” task as fa_host_source and _target.
The reason to retrieve these values are to be able to show some more descriptive names, rather than IP address in our Playbook. However we also we need the array_name of the source array, when we create a volume copy of that replicated snapshot. And since I don’t want too many variables to run the playbook, I rather just fetch these value from the array using Ansible.
Create and replicate a snapshot
The next step is to actually create a snapshot and replicate that to the remote array. Both the creation of the snapshot and the replication of the snapshot is done with a single task, using the “purefa_pgsnap” module.
  - name: "Create and replicate snapshot on {{ source_pg }}"
    purefa_pgsnap:
      name: "{{ source_pg }}"
      suffix: "{{ snapshot_name }}"
      state: present
      now: true
      apply_retention: true
      remote: true
      fa_url: "{{ fa_url_source }}"
      api_token: "{{ fa_api_token_source }}"
  - name: Wait until PG transfer is complete
    purefa_info:
      gather_subset: pgroups
      api_token: "{{ fa_api_token_target }}"
      fa_url: "{{ fa_url_target }}"
    register: array_info
    retries: 10
    delay: 5
    ignore_errors: true
    until: "array_info | json_query('purefa_info.pgroups.\"'+fa_host_source + ':' + source_pg+'\".snaps.\"'+fa_host_source + ':' + source_pg + '.' + snapshot_name+'\".progress') != 0.0"
The first task on line 1 uses the “purefa_pgsnap” module to create and replicate the snapshot. It takes the url and API token options to connect to the array. Next specify the name of the Protection Group on the source array that we want to create the snapshot for in the “name” option and we specify the name of the snapshot in the “suffix” option.
Finally we specify the “state” should be present, so only create the snapshot if it doesn’t already exists. We specify to replicate using the “remote: true” option and start the replication immediately using the “now: true: option. To make sure the snapshot doesn’t linger if we forget, I use the “apply_retention: true” parameter to make sure the retention policies of the Protection Group are applied to this snapshot.
With that we have created our snapshot and forced replication to the remote array. However before we can continu we want to make sure that the replication has finished. I used the “pure_facts” module for this. While most of this is pretty standard, the “until” option contains a bit of advanced json_query on line 20. It took me some time to get this right, but basically the only thing this line does is inspect the ansible_facts output, and loop until the “.progress” value for the snapshot is equal to “1.0”, meaning that replication has finished.
Create a volume copy on the target array
Now we have our snapshot replicated to the remote array and we are able to copy it into a new volume.
name: "Creating volume group if required"
 purefa_vg:
   vgroup: "{{ source_vol.split('/')[0] }}"
   api_token: "{{ fa_api_token_target }}"
   fa_url: "{{ fa_url_target }}"
   state: present
 when: source_vol.find("/") != -1
name: "Restore volume from the snapshot on {{ fa_host_target }}"
 purefa_pgsnap:
   name: "{{ fa_host_source }}:{{ source_pg }}"
   suffix: "{{ snapshot_name }}"
   state: copy
   restore: "{{ source_vol }}"
   overwrite: true
   fa_url: "{{ fa_url_target }}"
   api_token: "{{ fa_api_token_target }}"
The first step in line 1 is to check if the volume is in a volume group (which is the case for a VVOL volume) and if it is, create the volume group on the target array. This is only needed if we are working with VVOLs, but a good task to leave in the playbook, to make sure the next command will succeed even if the volume is in a volume group on the source array.
Next, line 11 uses the “purefa_pgsnap” command to create a copy of our source volume. By now the syntax should be quite clear, where the name specifies the name of the protection group, however now on the target array. And as you can see the name is build up by using the source array name that we collected using the fa_facts module, then a colon followed by the protection group name from the source array. In addition we specify which volume to restore from the protection group using the “restore” parameter. By using “overwrite: true” we make sure that if a previous version of the volume already exists we just overwrite it.
So we now have our volume available on the target array. And although I included some additional tasks to gather facts and loop until the replication is completed it only took two commands to clone the volume. First purefa_pgsnap to create and replicate the snapshot and than purefa_pgsnap to restore the volume on the remote array. Pretty straightforward.
If you want to go ahead and test this out, I have the entire script on my GitHub repo, so take a look:
https://github.com/dnix101/purestorage/blob/master/ansible/fa_clone_vol_to_remote_array.yaml
Part two of this blog
To continue with the next steps of the workflow, please join me in the second part of this blog https://d-nix.nl/2019/09/using-ansible-for-hybrid-cloud-devops-part-2-or-2/.